How to enable IPV6 from Comcast on your UniFi Security Gateway
Since a while I run my home network on Unify hardware. I have got the UniFi security Gateway 3P, 1 (but soon 2) UniFi AP-AC-Pro and a UniFi Switch 8 POE-150W. Of course a Cloud key to manage it all (so I don’t need to install Java on my PC).
Update (11/22/2017) for Unifi 5.7.7 or higher which added ipv6 support in the UI.
FInally ubnt added IPv6 support to the UI of Unifi. This was introduced in the 5.7.7 release. I removed the changes below from the config.gateway.json file. Provisioned the USG and confirmed all IPV6 settings were gone. My clients on the network didn’t get an IPv6 address anymore either. If you check your interfaces on the USG you should see an ipv6 address from Comcast. Your eht1 interface will only have a ipv4 address.
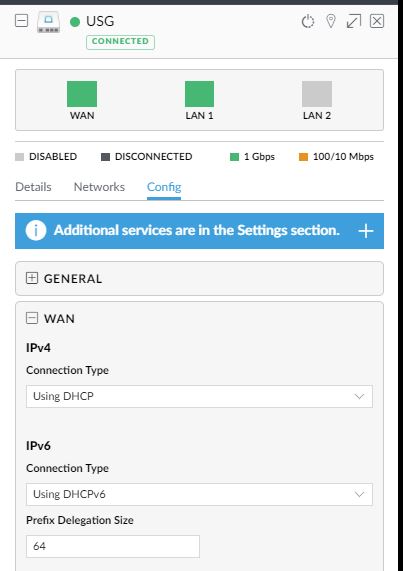
First open your USG device in your Unifi Dashboard and enable ipv6 as follows, for Comcast I filled in 64 as the Prefix Delegation Size
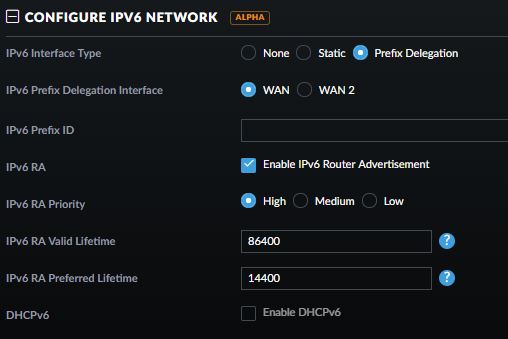
Next you have to configure ipv6 for all your networks. Go to Networks. open LAN (edit) and select the IPv6 interface type. Click save and your are set. You can enable this on other networks you have configured as well of course.
Now check your clients if they get an iIPv6 address and you can test at http://test-ipv6.com/ to see if everything works. Way simpler than with the config file. Cool new feature is you have IPv6 firewall rules in the UI as well under the Routing & Firewall chapter.
Information for Unifi below 5.7.7
So far there is no way to configure IPv6 through the UI, it’s on the roadmap though. But you can very easily set it up through the command line or through provisioning a configuration file. I have been searching in the forum and found several posts explaining how to do it but neither seemed to work 100% or perhaps I did something wrong.
The easiest is go through the command line. Make an SSH connection to you USG. I use Bash on Windows to be able to use SSH.
ssh adminname@192.168.1.1 (type yes if this is the first time you connect) enter your password to login to your gateway. You can enter show configuration to see what the current configuration is.
run the configure command and than run the following commands (I assume eth0 is your WAN connection with Comcast and eth1 is your internal LAN):
_**set interfaces ethernet eth0 dhcpv6-pd pd 0
set interfaces ethernet eth0 dhcpv6-pd pd 0 interface eth1
set interfaces ethernet eth0 dhcpv6-pd pd 0 prefix-length 64
set interfaces ethernet eth1 ipv6 router-advert prefix ::/64
set interfaces ethernet eth1 ipv6 router-advert managed-flag true
set interfaces ethernet eth1 ipv6 router-advert send-advert true**_
then enter the command commit
You will see some messages about Re-generating radvd config file for eth1… and Re-starting radvd: radvd.
type the command save
The next thing you might want to do is setup some firewall rules so you won’t expose all your machines with an ipv6 address directly to the internet. The following commands need to be entered in configuration mode again:
_**set firewall ipv6-name wan_in-6 default-action drop
set firewall ipv6-name wan_in-6 description wan_in
set firewall ipv6-name wan_in-6 enable-default-log
set firewall ipv6-name wan_in-6 rule 1 action accept
set firewall ipv6-name wan_in-6 rule 1 state established enable
set firewall ipv6-name wan_in-6 rule 1 state related enable
set firewall ipv6-name wan_in-6 rule 1 description “Allow Enabled/Related state”
set firewall ipv6-name wan_in-6 rule 2 action drop
set firewall ipv6-name wan_in-6 rule 2 log enable
set firewall ipv6-name wan_in-6 rule 2 state invalid enable
set firewall ipv6-name wan_in-6 rule 2 description “Drop Invalid state”
set firewall ipv6-name wan_in-6 rule 5 action accept
set firewall ipv6-name wan_in-6 rule 5 log enable
set firewall ipv6-name wan_in-6 rule 5 protocol icmpv6
set firewall ipv6-name wan_in-6 rule 5 description “Allow ICMPv6”
set firewall ipv6-name wan_local-6 default-action drop
set firewall ipv6-name wan_local-6 description wan_local
set firewall ipv6-name wan_local-6 enable-default-log
set firewall ipv6-name wan_local-6 rule 1 action accept
set firewall ipv6-name wan_local-6 rule 1 state established enable
set firewall ipv6-name wan_local-6 rule 1 state related enable
set firewall ipv6-name wan_local-6 rule 1 description “Allow Enabled/Related state”
set firewall ipv6-name wan_local-6 rule 2 action drop
set firewall ipv6-name wan_local-6 rule 2 log enable
set firewall ipv6-name wan_local-6 rule 2 state invalid enable
set firewall ipv6-name wan_local-6 rule 2 description “Drop Invalid state”
set firewall ipv6-name wan_local-6 rule 5 action accept
set firewall ipv6-name wan_local-6 rule 5 log enable
set firewall ipv6-name wan_local-6 rule 5 protocol icmpv6
set firewall ipv6-name wan_local-6 rule 5 description “Allow ICMPv6”
set firewall ipv6-name wan_local-6 rule 6 description “DHCPv6”
set firewall ipv6-name wan_local-6 rule 6 action accept
set firewall ipv6-name wan_local-6 rule 6 destination port 546
set firewall ipv6-name wan_local-6 rule 6 protocol udp
set firewall ipv6-name wan_local-6 rule 6 source port 547
set interfaces ethernet eth0 firewall in ipv6-name wan_in-6
set interfaces ethernet eth0 firewall local ipv6-name wan_local-6**_
commit and save again and you should be all set.
You can check if you received an ipv6 address by typing show interfaces
matthijs@ubnt:~$ show interfaces
Codes: S – State, L – Link, u – Up, D – Down, A – Admin Down
Interface IP Address S/L Description
——— ———- — ———–
eth0 73.225.151.24/23 u/u
2001:558:600a:31:521:e2b9:f034:96f8/128
eth1 192.168.1.1/24 u/u
2601:600:8701:1880:822a:a8ff:fef0:a49/60
eth2 – A/D
imq0 – u/D
lo 127.0.0.1/8 u/u
::1/128
And if you have an ipv6 address you can test the connection by using ping6 www.netflix.com
matthijs@ubnt:~$ ping6 www.netflix.com
PING www.netflix.com(2620:108:700f::3425:db06) 56 data bytes
64 bytes from 2620:108:700f::3425:db06: icmp_seq=1 ttl=44 time=30.7 ms
64 bytes from 2620:108:700f::3425:db06: icmp_seq=2 ttl=44 time=33.3 ms
^C
— www.netflix.com ping statistics —
2 packets transmitted, 2 received, 0% packet loss, time 1001ms
rtt min/avg/max/mdev = 30.740/32.035/33.331/1.307 ms
Another way to provision your USG is by creating a config.gateway.json file with your settings and place it in the /srv/unifi/data/sites/default directory on your cloudkey. (or equivalent directory when you are using the management software on another system like Windows or your Mac). You need to trigger a provisioning of your USG to make this configuration happen. This can be done by changing the HDCP lease range from 192.168.1.254 to 192.168.1.253 for example and save the configuration change. The provisioning will merge the USG configuration with the configuration in the json file.
This is the configuration file with the changes done through the command line:
{
  "firewall": {
    "ipv6-name": {
      "wan_in-6": {
        "default-action": "drop",
        "description": "wan_in",
        "enable-default-log": "",
        "rule": {
          "1": {
            "action": "accept",
            "description": "Allow Enabled/Related state",
            "state": {
              "established": "enable",
              "related": "enable"
            }
          },
          "2": {
            "action": "drop",
            "description": "Drop Invalid state",
            "log": "enable",
            "state": {
              "invalid": "enable"
            }
          },
          "5": {
            "action": "accept",
            "description": "Allow ICMPv6",
            "log": "enable",
            "protocol": "icmpv6"
          }
        }
      },
      "wan_local-6": {
        "default-action": "drop",
        "description": "wan_local",
        "enable-default-log": "",
        "rule": {
          "1": {
            "action": "accept",
            "description": "Allow Enabled/Related state",
            "state": {
              "established": "enable",
              "related": "enable"
            }
          },
          "2": {
            "action": "drop",
            "description": "Drop Invalid state",
            "log": "enable",
            "state": {
              "invalid": "enable"
            }
          },
          "5": {
            "action": "accept",
            "description": "Allow ICMPv6",
            "log": "enable",
            "protocol": "icmpv6"
          },
          "6": {
            "action": "accept",
            "description": "DHCPv6",
            "destination": {
              "port": "546"
            },
            "protocol": "udp",
            "source": {
              "port": "547"
            }
          }
        }
      }
    }
  },
  "interfaces": {
    "ethernet": {
      "eth0": {
        "dhcpv6-pd": {
          "pd": {
            "0": {
              "interface": {
                "eth1": ""
              },
              "prefix-length": "64"
            }
          },
          "rapid-commit": "enable"
        },
        "firewall": {
          "in": {
            "ipv6-name": "wan_in-6"
          },
          "local": {
            "ipv6-name": "wan_local-6"
          }
        }
      },
      "eth1": {
        "ipv6": {
          "dup-addr-detect-transmits": "1",
          "router-advert": {
            "cur-hop-limit": "64",
            "link-mtu": "0",
            "managed-flag": "true",
            "max-interval": "600",
            "other-config-flag": "false",
            "prefix": {
              "::/64": {
                "autonomous-flag": "true",
                "on-link-flag": "true",
                "valid-lifetime": "2592000"
              }
            },
            "reachable-time": "0",
            "retrans-timer": "0",
            "send-advert": "true"
          }
        }
      }
    }
  }
}This is the post in the forum which helped me fix this in the end.
Comments
Comment by Nate on 2017-09-17 16:22:49 -0800
Thanks a bunch for putting this together. It helped me get IPv6 going on my setup at home. I’m on TWC/Spectrum and other than fixing the odd asymmetrical double quotes it worked without modification.
Comment by Jose Olcese on 2017-10-09 16:15:17 -0800
Worked like a charm! Thanks
Comment by Jose Olcese on 2017-10-09 16:29:51 -0800
Couple of questions:
-
Why do you want the DHCPv6 rule on the WAN_LOCAL-6?
-
By allowing ICMP on both WAN_IN-6 and WAN_LOCAL-6 you are allowing to be ping’ed on both the USG and all the internal hosts. Why would you allow that?